|
AFUDOS BIOS Update
Procedure
Upon First Use of this Motherboard
Series
- Please insert a clean, unformatted disk into
A:\ drive and boot the system into DOS mode. In
DOS mode, please type in C:\> FORMAT A:
/S or click on "Add/Remove Software" icon in
"Control Panel" under Windows O/S. Choose
"Create Boot Disk" icon and click on the
"Create" button. By using the procedure above,
you can create a boot disk without AUTOEXEC.BAT
and CONFIG.SYS files.
- Then, place the bundled M/B support CD into
the optical drive. Copy AFUDOS.EXE
(unzipped) onto your boot disk.
Otherwise, please refer to ASUS Download Site
for latest version of AFUDOS.EXE BIOS
tool utility , please remember to
decompress the file before copy it onto the boot
disk. ASUS Download Site is located at http://www.asus.com.tw/support/download/download.aspx
Warning: AFUDOS.EXE
(unzipped) can only be executed in DOS mode
and not from MS-DOS Prompt in Windows O/S. As a
result, no matter if you wish to backup or
update the BIOS content, you must create a new
boot disk. Please copy AFLASH.EXE into the disk
which you wish to boot the system. In addition,
in the BIOS device boot sequence, you must set
boot from "Floppy Drive" as the first device in
the order of boot sequence.
AFUDOS BIOS Update
Procedure (If neccessary)
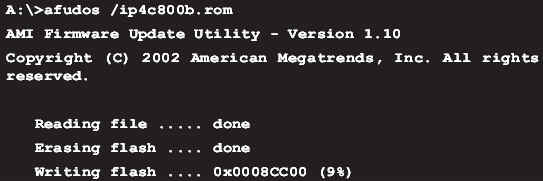
- Please use the prepared boot disk
to boot into DOS mode. Then, type
in the following commands: afudos
/i <Source Filename.Destination
Filename> For example,
afudos /ip4c800b.rom, <Source Filename.Destination
Filename> refers to the
fullname of the BIOS file. The following
shows the procedure of BIOS refreshing.
(Note: Please
don't switch off or reboot the system
during BIOS refreshing! By doing
so, you will cause serious damage
to your system.)
- After BIOS refreshing is complete,
the utility will return to DOS prompt
(as shown in the figure below),
please take out the floppy disk
and reboot the system to enter the
BIOS Menu.

2. Use
built-in EZ Flash
BIOS to Refresh
- Download latest ASUS BIOS from ASUS WWW
` FTP
and rename the BIOS filename to "xxxxx.ROM" (xxxxx
represents the motherboard model you used, eg.
P4C800 BIOS is named p4c800.ROM),
and save the file in a floppy
disk.
- Reboot the system.
- When the system is at POST after reboot,
please hold down <Alt> + <F2> to
view the following image. You may start
executing EZ Flash utility. Please place the
floppy disk with latest BIOS inside and insert
into the floppy drive.

Note: If you have not
placed any floppy disk into the floppy drive,
you will see a warning message stating
"Floppy not found". If the utility can not find
the correct files in the floppy disk, it will
show "p4c800.ROM not found!"
(Assuming the motherboard is P4C800)
message.
- The system will auto-detect whether the
floppy disk contains the relevant files in the
floppy drive. If there is no problem, the EZ
Flash utility will begin auto-refreshing and
reboot the system once it is done . The
procedure for refreshing is show below. (Note: Please don't turn off or
reboot the system during BIOS refreshing! By
doing so, you will cause serious damage to your
system!)

|

