|
AWDFLASH BIOS Update
Procedure
Upon First Use of this Motherboard
Series
- Please insert a clean, unformatted disk into
A:\ drive and boot the system into DOS mode. In
DOS mode, please type in C:\> FORMAT A:
/S or click on "Add/Remove Software" icon in
"Control Panel" under Windows O/S. Choose
"Create Boot Disk" icon and click on the
"Create" button. By using the procedure above,
you can create a boot disk without AUTOEXEC.BAT
and CONFIG.SYS files.
- Then, place the bundled
M/B support CD into the optical drive. Copy AWDFLASH.EXE
(unzipped) onto your boot disk.
Otherwise, please refer to ASUS Download Site
for latest version of AWDFLASH.EXE BIOS
tool utility , please remember to
decompress the file before copy it onto the boot
disk. ASUS Download Site is located at http://www.asus.com.tw/support/download/download.aspx
Warning: AWDFLASH.EXE
(unzipped) can only be executed in DOS mode
and not from MS-DOS Prompt in Windows O/S. As a
result, no matter if you wish to backup or
update the BIOS content, you must create a new
boot disk. Please copy AFLASH.EXE into the disk
which you wish to boot the system. In addition,
in the BIOS device boot sequence, you must set
boot from "Floppy Drive" as the first device in
the order of boot sequence.
AWDFLASH BIOS Update
Procedure
1. Use AWDFLASH.EXE BIOS to
begin refresh.
- Use the floppy disk prepared
previously.
- After entering DOS prompt via boot disk,
please copy AWDFLASH.EXE
(unzipped) utility and the BIOS file into
the hard disk to execute in order to increase
the performance of the system. For example,
please type in
"COPY
A:\AWDFLASH.EXE C:\"; and "COPY A:\BIOSfilename.BIN
C:\ "
(remember to type in the
actual name of the BIOS). After finish copying
the files, please type in "C:\" and press
<Enter> to change to C:\ drive command
from "A:\" drive. Then, key in
"AWDFLASH.EXE" and press <Enter>.
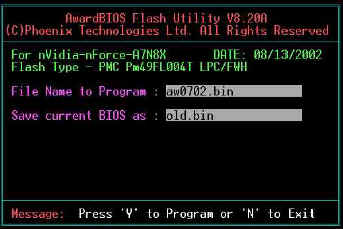
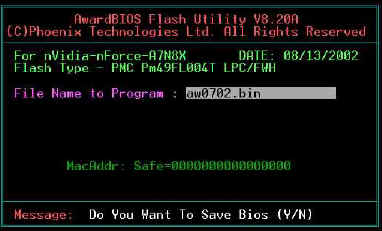
Now, the utility will begin executing. Under
File Name to Program: column, type in the BIOS
filename and hit <Enter> (as shown below).
Please insert the diskette containing lastest
BIOS version into the floppy drive. If you skip
this process and move onto the next one without
insert the floppy into the drive, you will
receive an error message stating "WARNING! Device not
ready".
- Please type in the BIOS filename from the
floppy disk under "File Name to Program:"
column and hit <Enter>. During refreshing,
it will auto-detect the floppy drive and the
floppy disk for the BIOS file you have key in.
Then, a message will appear stating "Do You Want
To Save BIOS (Y / N)", this asks you whether you
wish to backup the original BIOS utility or not.
If you need it, please type in [ Y ], and hit
<Enter> to proceed to next step.
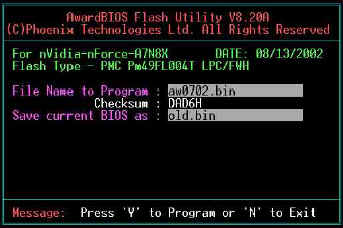
- In the image above, it asks whether you wish
to continue refresh the BIOS, choose [Y] to
continue proceed BIOS update procedure: Choose [
N ] for leaving the BIOS screen, reboot the
system and abandon BIOS update procedure.
- Choose [ Y ] and hit <Enter> to
proceed BIOS update. The procedure is as
followed:
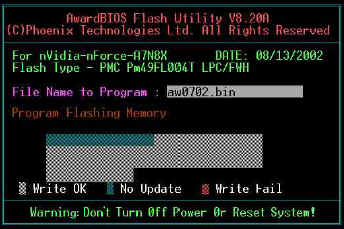
Warning! You must not turn
off the power or reboot the PC during the
process of updating BIOS Boot Block. By doing
so, you will increase the risk of unable to boot
your system. If your system does not reboot,
please consult with your local ASUS dealers or
contact ASUS Hotline.
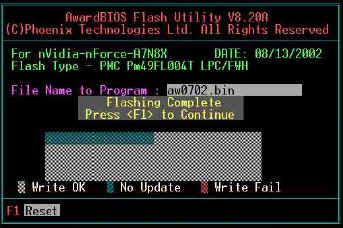
- When the procedure is complete, it will show
"Flashing Complete Press <F1> to Continue
" message, hit F1 to reboot the system. Now, the
system will reboot using the new BIOS you have
refreshed.
2. Use Built-in BIOS Refresh
Procedure
- Download latest ASUS BIOS from ASUS WWW、FTP for newest version BIOS and
save it in a diskette.
- Reboot the system.
- When the system is at POST after reboot,
please hold down <Alt> + <F2> to
view the following image.
The BIOS message shown
above is for reference. The information may not
be identical to the one shown on your
screen.
- Insert the diskette containing lastest BIOS
version into the floppy drive. If you skip this
process and move onto the next one without
insert the floppy into the drive, you will
receive an error message stating "WARNING! Device not ready"
.
- The remaining steps is identical to steps
"1. Use AWDFLASH.EXE BIOS to begin
refresh." section 3 to 6. Please refer to
the steps shown to proceed BIOS update.
|

